IAM - Getting Hands Dirty
- Amit Dhanik

- Aug 27, 2022
- 6 min read
Enough theory!! Let's take a look at what the IAM Dashboard looks like in AWS and do some practical. Log into your AWS Account and let's get started.
1. You can search for IAM in the search box. IAM is a Global service. It does not require any region selection.

2. Now let's go a step back. When you logged into your AWS account through the Root account user, you might have seen another option of signing in through the IAM User. It requires an Account ID or account alias.

This can be found on our IAM Dashboard, and this login URL needs to be given to every single IAM User.

As you can see this is a bit typical and hard to remember. So, we can customize this according to what suits us. When I customize this, I get a success message as - Alias created. IAM users in this account can now sign in with the new URL as well. This is easily readable and much easier to remember. Every user of the organization has to provide this alias before they are prompted to sign in using their username and password.

Groups > User
What do I mean when I say groups are much more important to know than users? You already might have guessed by now, but to reiterate - In a large organization where users are constantly being hired and fired, keeping track of individual users and attaching policies to each one according to their profile is a daunting task. To ease this, Groups come into play.
Note - Individual Users should never share their credentials with anyone. No matter what the situation is !! If any user does this, he might get into a big problem. Every user's responsibility is his account, and he should never leak the password of his account.
Let's understand Groups and Users with the help of an example. Consider the below diagram.

Let's suppose this organization has three Groups - Admins, Developer, and Tester. Let's see how we can create these with the help of our root account.
Admins- Admin group is the one that has been created with administrator policies. The users which are added to this group automatically inherit the Administrator permissions and automatically become the administrator. So, now users in this group will be able to do all the administrator-related tasks. Instead of assigning every single user who was hired to do administrative tasks, we can now attach the user directly to this group. Let's create the Admins Group
a. Go to IAM - User groups - Create Group

b. We give a name to our Group. We can also add existing users to the group. As of now, we don't have any, so we will add users later to our Admin Group

c. On the same page only, we can see below the policies we want to attach with this group. We search for Admin and select Administrator Access.

You can view the JSON policy that is defined behind this Administrator Access as well. Just click on it and the JSON opens up. Here, you can see that the Admin user has access to all resources and he can do anything he wants("Action": "*").

d. After this, you can click on Create Group. Your Group is now ready. Any users attached to this group will inherit the Administrator Access policy.

2. Developer - Similarly, we can create our second Group Developer as well. For the developer Group, we are going to provide permission only to the EC2, RDS, and S3 Bucket. If you look at the JSON of Full access to EC2, permissions are allowed for some other resources apart from EC2. This is because you might require the usage of these services along with EC2.

Note - While attaching multiple policies to your Group, you can search for the policy directly and then select it. After that, clear the filter and then search for the next policy and select it. This way you will be able to attach multiple policies to one group.
You can also search on google for the IAM Job function if you want a specific type you are looking out for.


Users
Now that we have made 2 Groups, let's create some users who will be a part of this group. As mentioned in the image above, we have Kim, Ted for admin, and Rob and Fred for Developer. Let's create these users.
a. We will go to users from the IAM Dashboard and click on Users. Here, we have the Add Users Option. Click on it.

b. We give our user name in the user details. We can add multiple users at once also. For access type, we have Programmatic access and Management Console Access. AWS console is the GUI where we are now creating our Users. Additionally, if a user wants programmatic access, to write some code, we can give him programmatic access as well. Then you can generate a password for your user which he will use to sign in for the first time. At last, you would see that it states a - Require Password Reset. This is generally followed all over so that the password that Admin assigns to the user is changed and the user gets to keep his own password. This is done so that the Admin doesn't know the password anymore. The user is 100% responsible for the account after he resets the password.

c. Next we attach users to the group. Since we are creating Users for the Admin group, we attach them with the Admin group. You can manually also attach existing policies but this is not generally preferred until it's for a specific user only(which you have to grant some special permissions which cannot be given to the whole group). Here we will not be attaching any permission boundaries for this user.

d. Note - We can also set Permission Boundaries for our Groups(inherited by Users in that Group). This is done to limit the scope of IAM Users to certain services. For eg - Suppose you want that the Admin user should not have access to Billing related services. This you can do by either creating a policy that restricts Billing access to admin or selecting from a preexisting one.

e. Next, we provide Tags for our Users. Generally, these are the employee IDs assigned to users.

f. Next, we can review the choices, and finally, if everything appears right, we can create our Users.

g. The access key ID and Secret Access key are only one-time visible. It is highly recommended to download the CSV if you are configuring the account for yourself or send an email if you are configuring an account for some IAM user
Note - If someone gets access to this Access key ID and Secret Access key, he can assume your role and do what he likes. Hence, it is advised to keep these keys safe.

h. Once we have done this, we can see our IAM users successfully created. Congrats!! You have successfully created a Group and assigned Users to the same.

i. Let's now log in using the IAM User. Remember the Sign-In URL you created for the ease of signing in for IAM Users(Explained in point2 above). You have to enter that in the Account ID.

After this, you are prompted to change your password and enter a new one. Covered in Point b under Users if you forgot!!

And Tada!! You are now login as IAM User which is having Administrative privileges.

Note - If for some reason, Ted forgets his password, it can be reset using the root account just by going to change the password for IAM User.
ROLES
Suppose we have an EC2 Instance that wants access to Cloudwatch. Roles help us in such a way that we can attach the Role created to our EC2 Instance and then EC2 will be able to access that service. Let's take an example.
a. We can go to the IAM Dashboard, click on Roles, and we get the create Role screen,

b. We can choose a service for which we will create a Role. Here I will go with the EC2 Instance with which we will attach the Cloudwatch service.

c. We will attach the permission policies of Cloudwatch Logs with our Role.

d. Skip the Tag part(or you can fill it if you want), and we can create our Role after giving our role a name. You can see your attached policies with it as well.

e. And our role is successfully created!!

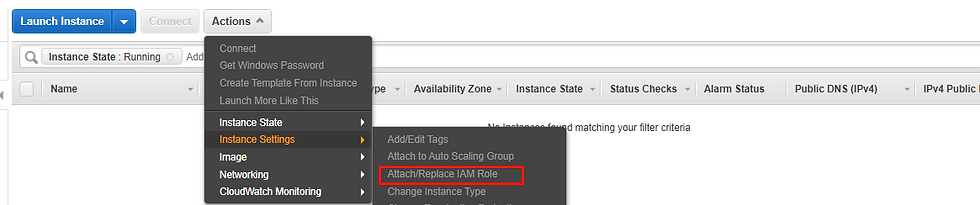
Note - A role is not automatically attached to your EC2 Instance. You have to go and attach it for it to work!! You have to go to the EC2 Dashboard, launch a new instance, and attach it. That's when your role will be effective.
So that was it!! With all the above stuff, you can now confidently create users, groups, and roles via IAM. A very good resource document on best practices for IAM is provided by AWS itself.
Here is the link, if you want to go through it.
Happy Reading !!


Comments