Jenkins - Everything you need to Know - Part 2
- Amit Dhanik

- Oct 25, 2022
- 6 min read
Hi Guys, in this post, we will be discussing a lot of interesting stuff that Jenkins allows us to do. So without wasting any more time, let's dive right in.
Prerequisite - If you have not read the previous post, it is highly recommended you read Getting started with Jenkins.
Security in Jenkins
Security, as you all know, for any tool is absolutely essential. If there is a loophole in your security, then it poses a danger to the entire project. Let's discuss how we can improve the security of Users in Jenkins.
DONT'S
Before heading further, I would like to mention one very important things which you should never do in Jenkins.
If you go to Manage Jenkins - Configure Global Security, you would see a checkbox to Allow users to sign up. You should never check this box as it poses security threats. If anyone is able to access your IP, then anyone could make an account, log in and do whatever he wishes.
Jenkins gives you a warning message itself - With signup enabled, anyone on your network can become an authenticated user. It is recommended in this case to minimize the permissions granted to any authenticated user.

Note - You can also configure your own LDAP server if you have one. This is not covered here.
Let's now look at how we can sign up Users successfully in Jenkins with proper permissions so all the users don't have access to the full Jenkins account except for the Root user.
a. Go to Manage Jenkins - Manage Plugins - and install a new plugin - Role-Based Authorization plugin. You already know how to install a plugin in Jenkins, if you don't know yet, it is covered in Part 1.

b. After the plugin has been installed successfully, now go to Manage Jenkins - Configure Global Security and select Role-based Strategy. Click on Save.


c. Now, in the same section of Security, we can see a new tab, Manage and Assign Roles. This shows your installation was successful.

d. Now click on Manage Users. We will create users who will have access to the services of Jenkins. As of now, we only have the admin user. Click on Create User.

e. Create the User, which is saved in Jenkins own user database.

f. If you log in with this user into Jenkins, you will see an error. This is because the user has not been granted any roles or permission yet.

g. To solve this, Click on Manage and assign roles - Manage Roles.

h. Roles are like the permission you provide to a user. For eg, in the below picture, you can see that the admin has all the permission, to read, write, execute, delete, and much more.

i. So for now, I will create a role that gives permission for read-only. You can add as many roles as you want, like a role that gives permission to Build only, and once that gives permission to Build, Configure and Delete a job. Click on Save at the bottom after you have created the role.

Assigning Roles to the Users
Now that we have created a Read-only role, let's assign it to the user we created. Remember, a role, on its own, cannot do anything. So, let's assign our first role to the user Amit.
a. Go to Manage Jenkins - Manage and Assign Roles and click on Assign Roles.

b. Add the user that you have created to the Global roles table. You can see here the role you created earlier(read-only) in Manage Roles. You have to add your user to that specific role only
Note - Add a user that exists in Jenkins Database, we have created the Amit user, hence we are adding the same.

c. After adding, check on the read-only role that you created. Now user Amit is assigned a read-only role. Click on the Save button below.

d. Now, if we try to login into the Jenkins using the Amit user, we see that we no longer get the permission error. You can see that this user has no access to build, configure or even see the jobs(we did not provide any permission for the jobs).

e. Note - I made a mistake in the above points. The Jenkins username is case-sensitive. If I go to Manage Users and see the user id - it is amit(all small caps)

While adding the user to the Global Roles table, I entered the user to be added as Amit( A being capital). If I tried to access Jenkins after this with the Amit username, I was still getting the permission denied error. So, it is important to note that while assigning roles, always make use of Jenkins User ID, otherwise Jenkins won't recognize the user.

f. If I want my user amit to have permission to read and build jobs as well, we can do that by simply going to Manage Roles, and we can checkmark the boxes for read and build. Click on save.

g. If we now log in again with amit user, we will be able to see the jobs and also build them, as the user amit has now permission to read and build as well.

Note 1 - In general, overall Read should always be marked so that users can access the Jenkins UI, without which they will always get the permission denied error.
Note 2 - If you want a user to have access to only specific set of Jobs that he can build, then Jenkins has something called Project Roles/Node Roles, which is based on patterns. Suppose you want only to give access to users to run python jobs, for that you can make use of Project Roles. The pattern should always end in -.*(dash-dot-asterisk)

You can then add the permissions for the user. For eg- I have provided Build and Configure permissions. Click on Save.

Assign Roles - Assign the role(will come under Node roles in Assing Roles) to one of the users. Log in with that user and he will only be able to access jobs starting with python.

That's it !! You now know how to create users and assign roles to them in Jenkins.
CRON Jobs
Suppose, in your production environment, there are some jobs that need to be run every midnight. For this, we will not be waking up in the middle of the night and triggering all these jobs. Jenkins provides us with a solution to do this. The CRON jobs in Jenkins can be used to schedule any jobs that you want to run at a specific time of the day, month, or year. Let's see how we can do this.
a. In the previous post, I discussed defining Global variables in Jenkins. We will configure the same job and now run it at a specific time. Go to the Job and click on Configure. Name of my build in ENV.

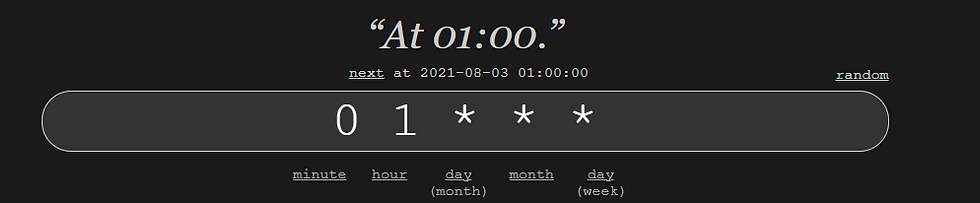
b. We go to the Build Trigger section and click on "Build Periodically". Suppose I want this job to be running at every midnight at 1 a.m every day. For the cron expression, you can simply visit this website. I have selected for 1 a.m for which the cron expression looks like below. This means that every day of the month, every week at 1 hr and 0 min, this job will be triggered. You can change it to 2, 3, 6:30 whatever you want.
c. In the Build Triggers, we can then paste the same value. But Jenkins gives us a warning. It says to use H instead of 0. This is just because if there are several jobs running at midnight at 1 am, Jenkins knows the priority and runs them accordingly. So. we can replace 0 by H here for now. It also tells us when will the job be run next.
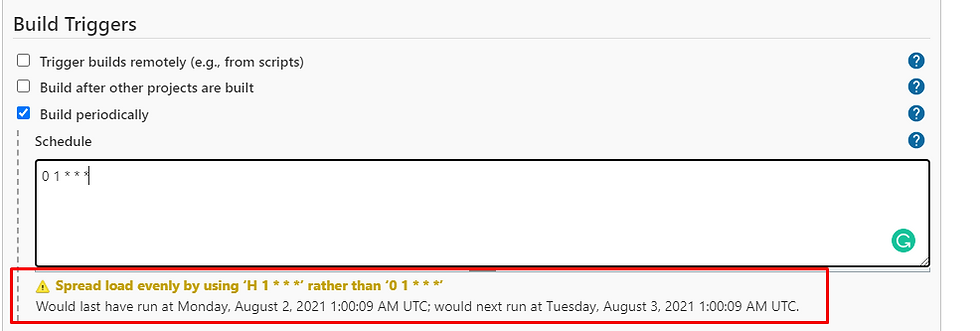
d. Now the warning goes away.

e. For the sake of execution, let's run the job for every single minute and see if it's automatically getting triggered or not.

f. Jenkins gives us another warning this time, saying "Do you really want to run a job every single minute since this is not feasible. But for this one, we will execute every single minute. Click on Save and in the next minute, we should have the build triggered automatically.

g. You can see in the build history that Jenkins keeps on executing the jobs every single minute. So now you know how to set up a cron job in Jenkins !!
Note - Remember to change the timing or disable the Build periodically button in your job. Otherwise, Jenkins will keep on executing the jobs!! Just unselect the Build periodically and click on Save.


Comments